Categories
Breads

Fluffy Biscuits

Light Fluffy Biscuits


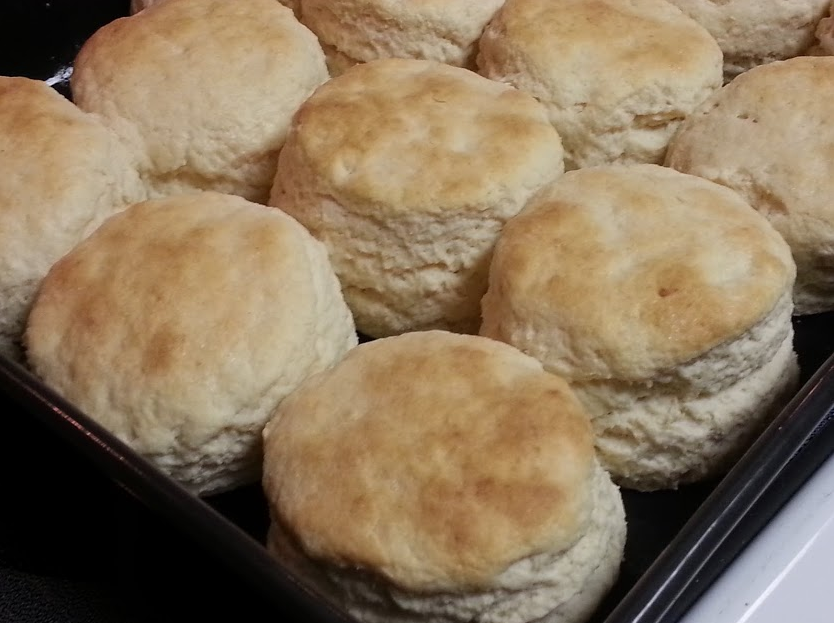
“Where’s the Biscuits?”   This is what my husband will jokingly say if I make a nice big dinner and there aren’t any biscuits.  So last night for dinner, I made these light, fluffy biscuits so that he wouldn’t be able to make his little joke.  What a spoil sport I am!

There are a few tricks to making great fluffy biscuits.  First of all, use cold butter cut into thin slices and cut it into the flour with a pastry cutter.

Add the milk all at once to the flour and stir it up with a fork.  Add additional flour until the dough is no longer sticky.  I usually end up adding up to 3/4 cup additional flour.

When you knead the dough, fold it over in half and press it down then repeat that about 4 or 5 times then put it on the counter to roll them out.

If you place the cut out biscuits with their sides touching in your baking pan, they kind of assist each other in rising up tall, versus spreading them apart on the baking dish.

After the biscuits are baked, brush the tops with melted butter.

Fluffy Biscuits

Ingredients:

2 cups self rising flour
1 tablespoon sugar
1 stick of butter
1 1/4 cup half & half

Directions:

Preheat oven to 450° F.  Combine flour and sugar in mixing bowl.  Cut butter into flour until crumbly.  Stir in half & half until moistened.  Add additional flour as you knead the dough until the dough is no longer sticky.

Sprinkle a little flour on a clean counter and rub some flour on your rolling pin.  Place the dough on the counter and roll it out to 1/2 – 3/4″ thickness.  Cut out biscuits using a round cookie cutter.  (I use a small can that has both ends cut off – like an olive can or green chile pepper can)

Place on baking dish with sides lightly touching.  Bake for 10 – 14 minutes.  Brush tops with melted butter.

These light, fluffy biscuits will be a hit at your next meal!  Enjoy!

If you like my recipes, be a sweetie pie and share on Facebook,
Like my page “I Love To Cook” and Pin these yummy recipes on Pinterest.  🙂

Here’s the Pinterest link for these awesome biscuits:  Light Fluffy Biscuits

Sharon Springfield

Sharon Springfield  

Sharon Springfield on PinterestSharon Springfield on FacebookFollow Me On Google+

http://sharonspringfield.com/images/cooking-blog-logo.jpghttp://sharonspringfield.com/wp-content/uploads/2013/07/youtube-150x150.jpg


Powered by WordPress Plugins – Get the full version!

Light Fluffy Biscuits

Categories
Desserts Mousse

S’mores Mousse Cups

S'mores Mousse CupsToday’s recipe is from InKatrinasKitchen.com and is a recipe for S’mores Mousse cups.

S’mores Cups Recipe

YIELD: 8 mini dessert cups

PREP TIME: 15 minutes

TOTAL TIME: 3 hours, or overnight

“Fluffy S’mores no-bake mousse cups

INGREDIENTS:

  • 8oz Cream Cheese, room temperature
  • 4oz package of chocolate pudding (powder)
  • 2 Cups powdered sugar
  • 1/2 Cup Biscoff spread
  • 8oz tub of Cool Whip
  • 2-3 Tablespoons milk
  • marshmallows and graham crackers for garnish

DIRECTIONS:

  1. In the bowl of your electric mixer combine cream cheese, powdered sugar, pudding powder, milk, and Biscoff spread.
  2. Fold in Cool Whip
  3. Pipe into cups of any size and garnish with graham crackers and marshmallows.
  4. Chill for at least 3 hours or overnight (will become a firmer consistency)

NOTES:

  • I have also made this in a 9×13 dish layered between graham crackers.
  • Biscoff spread gives a hint of graham cracker taste in the dish. You can substitute peanut butter if you do not have Biscoff available to you.
  • I did not try this recipe with fresh whipped cream so I do not know if you can substitute it for the Cool Whip.”

 ~This delicious recipe brought to you by In Katrinas Kitchen 
http://www.inkatrinaskitchen.com/2012/09/smores-cups-staying-connected-verizon.html

If you like my recipes, be a sweetie pie and share on Facebook,
Like my page “I Love To Cook” and Pin these yummy recipes on Pinterest.  🙂

Here’s the Pinterest link for Smores Mousse Cups:  Smores Mousse Cups

Sharon Springfield

Sharon Springfield  

Sharon Springfield on PinterestSharon Springfield on FacebookFollow Me On Google+

http://sharonspringfield.com/images/cooking-blog-logo.jpghttp://sharonspringfield.com/wp-content/uploads/2013/07/youtube-150x150.jpg


Powered by WordPress Plugins – Get the full version!

Smores Mousse Cups

Categories
Cakes Desserts Pie Southern

Pecan Pie Cake


Pecan Pie Cake

This recipe comes from a facebook post and is from the blog Sweet Jeanette. (http://sweetjeanette.blogspot.com/2011/12/pecan-pie-cake.html)  Jeanette got the recipe from Southern Living Magazine.

We all know Southern Living recipes are all awesome and Pecan Pie and Cake all rolled into one must be good.  So here’s the recipe:

Pecan Pie Filling

1/2 cup firmly packed dark brown sugar
3/4 cup dark corn syrup
1/3 cup cornstarch
4 egg yolks
1 1/2 cups half-and-half
1/8 tsp salt
3 TBSP butter
1 teaspoon vanilla extract (the real stuff)
Whisk together the first 6 ingredients in a heavy 3-quart saucepan until smooth. Bring to a boil over medium heat, whisking constantly, and boil for 1 minute, or until thickened. Remove from heat; whisk in butter and vanilla. Place a sheet of wax paper directly on surface of mixture to prevent a film from forming, and chill at least 4 hours.
Now for the cake….
Pecan Pie Cake
3 cups finely chopped pecans, toasted and divided
1/2 cup butter or margarine, softened
1/2 cup shortening
2 cups sugar
5 large eggs, separated
1 TBSP vanilla extract
2 cups all-purpose flour
1 tsp. baking soda
1 cup buttermilk
3/4 cup dark corn syrup
Sprinkle 2 cups pecans evenly into 3 generously buttered 9-inch round cake pans; shake to coat bottoms and sides of pans.
Beat butter and shortening at medium speed with an electric mixer until fluffy, and gradually add sugar, beating well. Add egg yolks, 1 at a time, beating just until blended after each addition. Stir in vanilla.
Combine flour and baking soda. Add to butter mixture alternating with the buttermilk, beginning and ending with flour mixture. Beat at low speed just until blended after each addition. Stir in remaining 1 cup pecans.
Beat egg whites at medium speed until stiff peaks form, and fold one third egg whites into batter. Fold in remaining egg whites. (Do NOT over mix). Pour batter into prepared pans.
Bake at 350 for about 20-25 minutes. I always set timer to go off 5 minutes before to be safe. Silly oven!
Check for doneness with the old toothpick inserted into center test.
Cool in pans on wire racks for about 10 minutes, then invert onto the wire racks.  Put some wax paper down under the wire racks… Trust me! You’ll be glad you did!
Brush the tops and sides of layers with corn syrup, and cool completely. (See, aren’t you glad you listened?)
Spread half of pecan pie filling on one layer, pecan side up. Place second layer, pecan side up, on filling, and spread with remaining filling. Top with remaining layer, pecan side up.

If you like my recipes, be a sweetie pie and share on Facebook,
Like my page “I Love To Cook” and Pin these yummy recipes on Pinterest.  🙂

Here’s the Pinterest link for Pecan Pie Cake:  Pecan Pie Cake

Sharon Springfield

Sharon Springfield  

Sharon Springfield on PinterestSharon Springfield on FacebookFollow Me On Google+

http://sharonspringfield.com/images/cooking-blog-logo.jpghttp://sharonspringfield.com/wp-content/uploads/2013/07/youtube-150x150.jpg


Powered by WordPress Plugins – Get the full version!

Pecan Pie Cake

Categories
Breakfast Hash Brown Potatoes Potatoes

Waffle Iron Hashbrowns

Waffle Iron Hashbrowns

Here’s an neat trick that I saw on Pinterest for making waffle iron hashbrowns that I tried and loved and just had to share.  It was really easy, quick and made our breakfast more special than usual.

Here’s how I did it:

Thaw frozen tater tots and crumble into a bowl.  Heat waffle iron and brush with a little cooking oil.  (You can probably skip this step if your waffle iron is well seasoned.  I used oil because our waffle iron is new and it was probably unnecessary after all because the tater tots are already oily.)

Spread a layer of the crumbled tater tots evenly over the surface of the waffle iron.  Close the lid and mash it down really hard.  Let it cook until the waffle iron indicates that it’s done.  You can peek at it after a couple minutes.  Let it cook until it’s crispy and lightly browned.

Remove the cooked hashbrown from the waffle iron and repeat with the remaining potatoes until you’ve run out of potatoes.

If you like my recipes, be a sweetie pie and share on Facebook,
Like my page “I Love To Cook” and Pin these yummy recipes on Pinterest.  🙂

Here’s the Pinterest link for Waffle Iron Hashbrowns: http://www.pinterest.com/pin/280278776784238250/?ref=waffle-iron-hashbrowns

Sharon Springfield

Sharon Springfield  

Sharon Springfield on PinterestSharon Springfield on FacebookFollow Me On Google+

http://sharonspringfield.com/images/cooking-blog-logo.jpghttp://sharonspringfield.com/wp-content/uploads/2013/07/youtube-150x150.jpg


Powered by WordPress Plugins – Get the full version!

Waffle Iron Hashbrowns

Categories
Cakes Desserts Southern

Mississippi Mud Cake

Mississippi Mud Cake

Mississippi Mud Cake

Easy version:

Brownie mix for 9×13 size pan
3 eggs
1 stick of butter, melted
1/2 cup half & half
1/2 cups chopped pecans
1 large container of Marshmallow fluff
1 container of dark chocolate frosting

Prepare a 9×13 glass baking dish by greasing it with crisco or butter.

Mix up the brownie batter substituting butter for the oil called for in the mix, half & half instead of water and 3 eggs instead of one. (If your mix’s instructions are different, just adjust the amounts of butter and milk to the called for amounts of oil and water.)  Stir in the nuts after the batter is no longer lumpy.  Spread evenly in the baking dish and bake according to the times given on the mix.

Cool brownie layer on a wire rack for 30 minutes.  While still slightly warm, spread the marshmallow fluff all over the top of the brownies.  Cool in refrigerator for 30 minutes.

Remove the lid and foil from container of frosting.  Microwave for 30 seconds and stir until smooth and pourable.  Pour over the marshmallow layer, spreading it if necessary to coat the whole cake.

Cover with plastic wrap and refrigerate for a couple hours before serving.

If you like my recipes, be a sweetie pie and share on Facebook,
Like my page “I Love To Cook” and Pin these yummy recipes on Pinterest.  🙂

Here’s the Pinterest link for Mississippi Mud Cake: http://www.pinterest.com/pin/280278776784206954/

Sharon Springfield

Sharon Springfield  

Sharon Springfield on PinterestSharon Springfield on FacebookFollow Me On Google+

http://sharonspringfield.com/images/cooking-blog-logo.jpghttp://sharonspringfield.com/wp-content/uploads/2013/07/youtube-150x150.jpg


Powered by WordPress Plugins – Get the full version!

Mississippi Mud Cake

Categories
Rice Risotto Side Dishes

Mushroom Vegetable Risotto

Mushroom Vegetable Risotto

Delicious creamy Mushroom Vegetable Risotto

1 cup Arborio rice
2 Tbs butter
Salt
garlic powder
1 packet Lipton Vegetable soup mix
8 oz diced fresh mushrooms
8 oz chicken broth + additional broth added during cooking
white wine – some for the recipe, the rest for the cook  😉
1/4 cup shredded Swiss cheese
1/4 cup shredded Parmesan cheese

Saute rice in melted butter for a few minutes.  Add a dash of salt and garlic powder.  Add mushrooms and saute a couple minutes more.  Pour in 8 oz chicken broth, stir.  Bring to a simmer, stirring frequently.

As the liquids are absorbed, add more chicken broth or wine a little at a time and keep simmering, stirring and adding more liquids as needed until the rice is tender.  (This is kind of tedious but will be worth it!)

When rice is finally tender stir in the cheeses.

Ta-Dah!  Enjoy your Risotto!

If you like my recipes, be a sweetie pie and share on Facebook,
Like my page “I Love To Cook” and Pin these yummy recipes on Pinterest.  🙂

Here’s the Pinterest link for Mushroom Vegetable Risotto

Sharon Springfield

Sharon Springfield  

Sharon Springfield on PinterestSharon Springfield on FacebookFollow Me On Google+

http://sharonspringfield.com/images/cooking-blog-logo.jpghttp://sharonspringfield.com/wp-content/uploads/2013/07/youtube-150x150.jpg


Powered by WordPress Plugins – Get the full version!

Mushroom Vegetable Risotto

Categories
Appetizers Dips

Pimento Cheese

Pimento Cheese

Pimento Cheese

1 1/2 cup Mayonnaise
1 (4 oz) jar diced pimentos, drained
1 tsp Worcestershire sauce
1/4 tsp cayenne pepper
16 oz sharp cheddar cheese  (freshly shredded – not pre-packaged shredded)

Mix together the first 4 ingredients then stir in the cheese until well mixed.  Refrigerate for 24 hours before serving.

*recipe and picture posted on facebook by “Musings of a Plus Size Southern Girl” fb page.

Pin it!  Here’s the link: http://www.pinterest.com/pin/280278776784196046/

Sharon Springfield

Sharon Springfield

  Sharon Springfield on PinterestSharon Springfield on FacebookFollow Me On Google+ http://sharonspringfield.com/images/cooking-blog-logo.jpghttp://sharonspringfield.com/wp-content/uploads/2013/07/youtube-150x150.jpg

Categories
Appetizers Dips

Pepperoni Ranch Dip

Pepperoni Ranch Dip I saw a similar recipe on Pinterest and it looked really tasty, so I headed into the kitchen to make a similar dip with the ingredients that I already had on hand.  Here’s what I came up with.

Pepperoni Ranch Dip

Pepperoni Ranch Dip Ingredients Combine the following ingredients in a bowl:

4 oz. shredded Monterrey Jack cheese
2 green onion tops, thinly sliced
1/2 package mini pepperonis
1/3 cup mayonnaise
2 Tbs Ranch Dressing Mix powder Pepperoni Ranch DipPour Pepperoni Ranch dip into a serving bowl.  Serve with crackers. *Keep refrigerated This dip recipe is LOW CARB too!  So as long as you don’t over-do the crackers, you can eat this when you are watching your carbs.  🙂 Hope you enjoy this Pepperoni Ranch Dip!

Pin this recipe on Pinterest!  http://www.pinterest.com/pin/280278776784192564/

Sharon Springfield

Sharon Springfield

  Sharon Springfield on PinterestSharon Springfield on FacebookFollow Me On Google+ http://sharonspringfield.com/images/cooking-blog-logo.jpghttp://sharonspringfield.com/wp-content/uploads/2013/07/youtube-150x150.jpg

Low Carb Pepperoni Ranch Dip

Categories
Main Dish Sandwiches & Wraps

BBQ Cornbread Waffle Sandwich

Barbecue Cornbread Waffle Sandwich

BBQ Cornbread Waffle Sandwich

No buns?  No bread?  No Problem!  Just whip up some waffles using cornbread batter and use the waffles as your buns.

Use your favorite BBQ beef or pork to top the cornbread waffles, top with additional BBQ sauce and French’s french fried onions.

Here’s the recipe I used for the cornbread waffles:

1 1/4 cup self rising flour
3/4 cup self rising cornmeal
2 tablespoons sugar
2 eggs
1 1/4 cup milk or half & half
1/4 cup cooking oil

Whisk together the above ingredients in a mixing bowl.  Make waffles according to your waffle maker’s instructions.

Pin this recipe on Pinterest!  http://www.pinterest.com/pin/280278776784183734/

Sharon Springfield

Sharon Springfield  

Sharon Springfield on PinterestSharon Springfield on FacebookFollow Me On Google+

http://sharonspringfield.com/images/cooking-blog-logo.jpghttp://sharonspringfield.com/wp-content/uploads/2013/07/youtube-150x150.jpg

Cornbread Waffle BBQ Sandwiches

Categories
Breads Breakfast

Elvis Muffins – Peanut Butter Banana Nut Muffins

Elvis Muffins

This classic combination, made famous by Elvis – Peanut Butter & Bananas, come together in these delicious, moist muffins.  These muffins are so good, you won’t want to stop eating them!  Personally, I may never make regular Banana Nut Muffins again.

These muffins were my first time using my new Silicone Cupcake Liners.  Love, love, love them!  The muffins practically fell out of them and to clean them, I just turned them inside out and brushed them with a little soapy water.  Super easy to clean.  No kidding, you need to get a set of these. You’re welcome. 🙂
Red Silicone Bake Cups Set of 12
Recipe for Elvis Muffins – Peanut Butter Banana Nut Muffins

Preheat oven to 375º F.  Prepare muffin pans by greasing them with cooking oil or non stick spray or line them with cupcake liners.  (Silicone ones work the best! – See above.)

In one bowl, whisk together:

1 1/2 cup all purpose flour
1/2 cup whole wheat flour
2 teaspoons baking powder
1 teaspoon cinnamon
1/2 teaspoon baking soda
1/4 teaspoon salt
1/8 teaspoon nutmeg
2/3 cup chopped pecans

In another bowl, whisk together:

1 egg
3 mashed bananas
3/4 cup light brown sugar
4 heaping tablespoons of peanut butter
1/4 cup cooking oil
1 teaspoon vanilla

Add flour mixture to wet ingredients.  Stir just until combined.  Don’t over mix.  Batter should be smooth.

Spoon into muffin cups.  Fill 3/4 full.

Bake about 15-18 minutes.  Toothpick inserted in center of muffin will come out clean.   Cool a few minutes before removing from pan.

*When I made these, there was some batter left over so I greased a small loaf pan and made a little mini loaf of peanut butter banana bread.

Pin it!  Here’s the link: http://www.pinterest.com/pin/280278776784157161/

Sharon Springfield

Sharon Springfield  

Sharon Springfield on PinterestSharon Springfield on FacebookFollow Me On Google+

http://sharonspringfield.com/images/cooking-blog-logo.jpghttp://sharonspringfield.com/wp-content/uploads/2013/07/youtube-150x150.jpg

Elvis Muffins – Peanut Butter Banana Nut Muffins